DIY: Rustic Mason Jar Wall Holder

IMG_3616

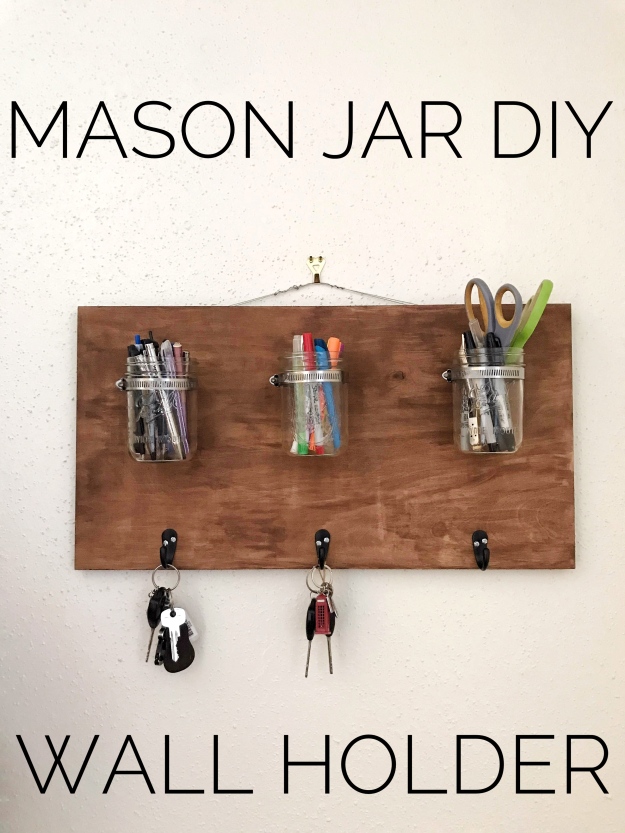
When I moved into my new apartment a few months ago, I was inspired to start more home decor projects. Mason jars have been popular lately along with rustic styles. One of my favorite things to do is walk around craft stores or a Target to get some crafting inspo. At every store I kept seeing these mason jar holders, but like most things that are trendy for the home, they usually come with a large price tag.

I made my own version of this functional home decor based on this super helpful video tutorial from TheSorryGirls (They are so creative and I love getting inspiration from them!).
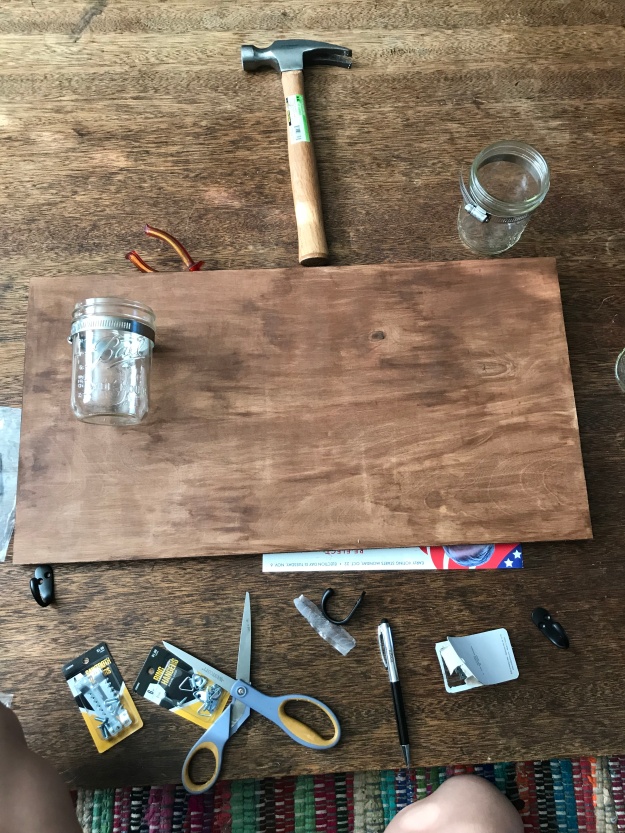
Materials

  • 3 Mason Jars
  • 3 Hose Clamps // I got a 10-pack from Amazon (Size: 1/2 in width, 1 13/16 – 2 3/4 in diameter). Make sure to check the sizing! The first pack I bought was too small to wrap around the jars.
  • Ply wood piece // Home Depot has spare wood pieces for free! And you can choose the size you want, or have the employee there cut it to size for you. Love Home Depot.
  • 3 Hooks // I got mine from Amazon
  • 3 long screws // I used the screws that came with the hooks from Amazon
  • Wood Stain
  • Sawtooth Photo Frame Mounts
  • Hammer
  • Measuring tape or long ruler

IMG_2770

Since the ply wood piece I grabbed from Home Depot was unstained and unfinished (I forgot to take a photo – whoops!), the first thing I did was sand down the sides and corners to smooth everything down. Next, I stained the wood by painting a on a few a coats of the dark wood stain. Note: I have never stained wood before so if there’s a more professional way to do it, please share with me!

img_2772.jpg

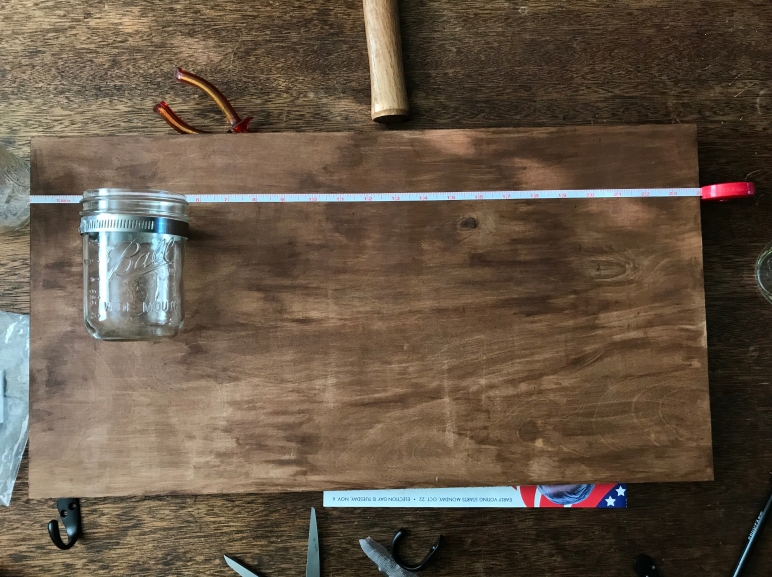
Once the stain is dry, using the ruler or measuring tape, mark three evenly spaced points to note where the mason jars will be.

IMG_2776

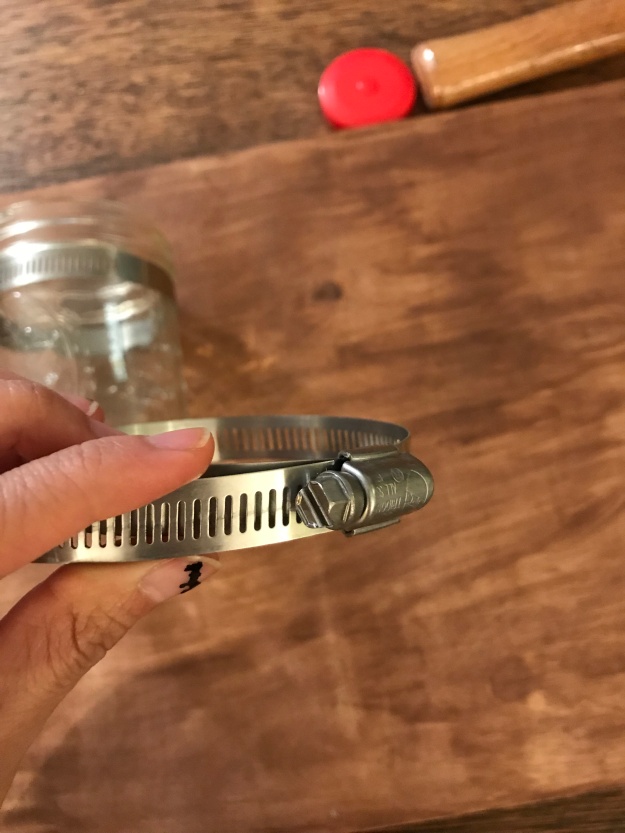
The hose clamps will wrap around the jar and attach to the wood piece. Adjust the width by loosening/tightening the screw on the side.

IMG_2778

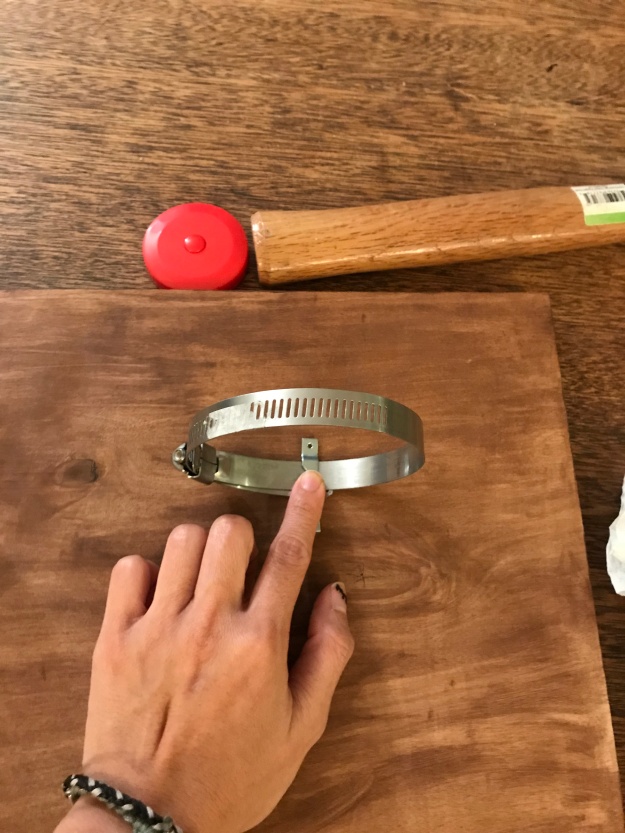
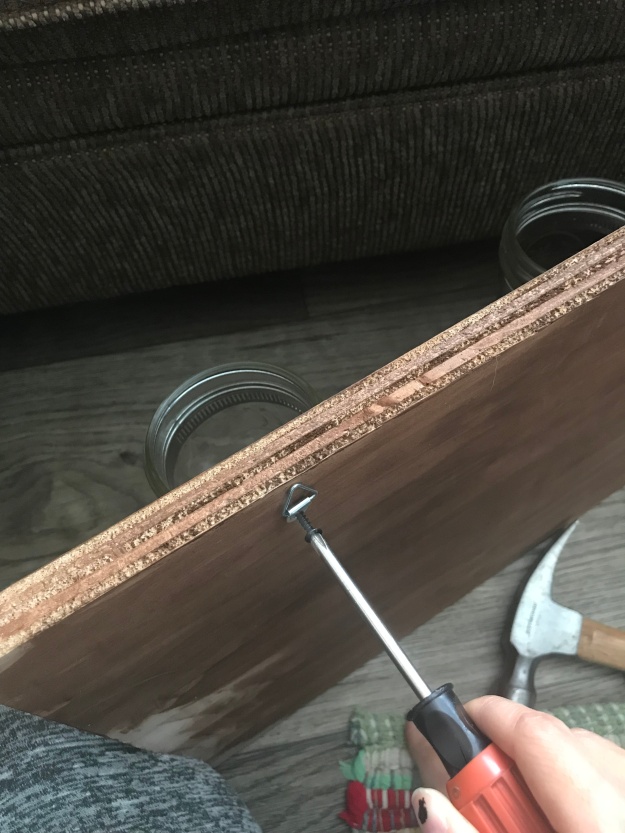
Place the hose clamp over the mark you made. Make sure the screw part of the clamp is facing out so that it can still be adjusted after it’s attached (see photo above). Place a sawtooth wall mount over the clamp to secure, then nail it in place. Once secured, repeat this for the remaining two mason jars.

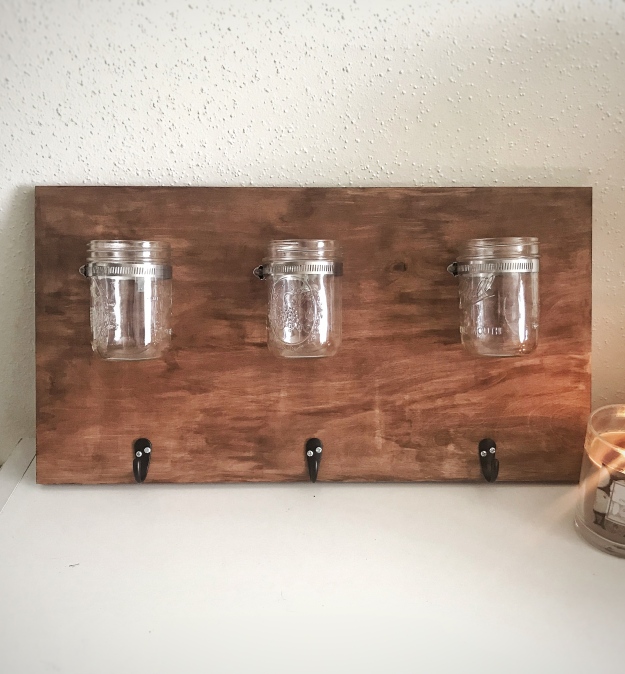
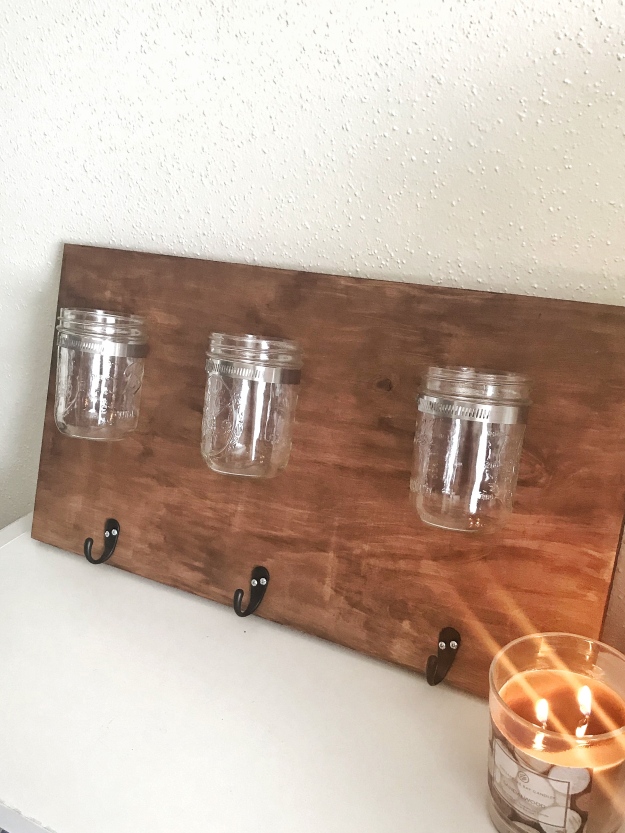
Finally, screw the hooks onto the wood piece. This part is optional and you can place them wherever you’d like on the piece depending on the aesthetic you’re going for! I wanted the whole decor to be functional, so I screwed in 3 hooks, one under each jar.

Final Look

IMG_2812 2

IMG_2813 2

Figuring how to mount the whole piece took some trial and error. Since it was pretty heavy, I ended up attaching two triangle hooks to the back: one on each corner. Then, I looped wire around the triangles so that I can hang it from the wire (see first photo of this post).

IMG_2810

Afterthoughts

Less-expensive hose clamp options: Since I bought a 10-pack of hose clamps, I was left with a bunch of hose clamps after this project that I have no use for (yet). I realized pretty soon after that you can buy individual hose clamps at Home Depot (HD coming thru again!!) for  $.98 each, which is a super DIY steal!

Other mounting ideas: A friend of mine had the idea that I could drill holes to the top corners and attach a thick rope to it. I loved this for many reasons: 1. I love using my drill, 2. It matches really well with a hanging shelf I made (post coming soon!), and 3. It really enhances the rustic look so much more.

This was one of my favorite DIY’s because of how accessible it was and how functional and versatile it can be! I can use it to hold pens and pencils, kitchen utensils, or as a plant holder. So many options!

signature

DIY: Wire Grid Photo Organizer

IMG_3592

I loved this project because it was a super simple project with easy-to-find hardware store materials that were all under $10! Over the past several years, I’ve played around with different ways to hang my pictures, postcards, and little notes I kept from friends (most recently I’d been hanging them with clothes pins and string). I’d recently rearranged my space and decided it was time for an upgrade in my wall decor as well. I wanted something that looked clean, could fill wall space without looking overcrowded, and would be easy to hang up photos. I’d seen wire grid wall organizers around the internet and at stores like Urban Outfitters, and I really liked the industrial, organized mess look. The prices I saw for these wire grids hit around $40, which motivated me to get into crafting mode. After some research and trial-and-error, I was finally able to make it with an inexpensive wire sheet from the hardware store (aand by inexpensive I mean under $8! What. A. Steal.).

Materials

  • Rebar Remesh Sheet //  I ordered mine from Home Depot for $7.36. They’re mesh sheets that are used to lay tiles so they are pretty large, usually 42in x 7ft. The squares are 6 in x 6 in, which I think are the perfect size for this project!
  • Bolt Cutters/heavy duty wire cutters // The metal on the mesh sheet is fairly thick, so I actually bought mini bolt-cutters from Amazon. The mini bolt cutters still required some arm strength, but it definitely did the job.
  • Cable clips + nails // I got a bag of 100 for $3.95 on Amazon \.

The mesh sheet was very rusty, so I first wiped it down with a wet wash cloth. Once it’s cleaned, measure out the size you want your final grid to be, then cut it to size with bolt cutters or heavy-duty wire cutters. I made my final grid 7 x 7 squares.

IMG_3495

IMG_3496

IMG_3499

Next, I used cable clips and long nails to hang the grid. I nailed in 3 at the top and 3 on the bottom of the grid to make sure it was secure. I used really small cable clips (6mm), and hindsight I’d recommend using a larger size because this will provide some space between the wall and the grid, which will help when clipping photos onto the grid.

IMG_3502

IMG_3500

And that’s it! To hang photos I used a variety of mini clothes pins and clips, but you can choose any sort of clip. Different ones will also have a slightly different aesthetic, so you can really customize it! I’ve also seen some other crafters spray paint the grid, so there’s lots of options to make it look the way you want! I liked the industrial look so I kept mine the way it was.

IMG_3504

IMG_3508

IMG_3505

Afterthoughts

Making this from scratch: You can definitely make this wire from scratch if that’s more of your jam. Here is a great tutorial on how to. When I tried this, my frugal self wanted to stick with the cheapest dollar-store wire I could find, and I ended up with wire that wasn’t thick enough. The process of straightening each wire piece and then measuring out the grid also was taking forever. I think if I bought better quality/thicker wire, this method would have been more successful.

Cutting the grid: The mesh sheet was way larger than anticipated. If I were to do this again, I would have gotten the sheet cut to size at Home Depot before trying to transport it home (and subsequently scratching up my car interior and later exerting my arm strength trying to cut the wire myself).

Hanging the grid: Even though the size of the cable clips I used worked, I think using a larger size would have been more effective. It helps to have space in between the wall and the grid, and a larger size would be a sturdier support.

Overall, I’m super happy with how this turned out! I love using hardware store materials in a creative way, and it’s a great way to save a few bucks, too.

signature

DIY Graphic Tees


Recently Updated2 copy

This past weekend I decided it was time I expanded my closet…and why buy more clothes when I can just revamp some old tees I have?  Using fabric paint to make your own shirt is a really fun way to get creative, personalize, and also save money! I’ll admit it took way longer to make than I thought (measured by the amount of Nikita episodes I got through on Netflix), but it was worth it! I honestly think the cactus tee is my new favorite casual top in my wardrobe.

Continue reading “DIY Graphic Tees”

DIY Tree Jewelry Stand

tree stand

I don’t usually wear a lot of jewelry, but somehow I have accumulated enough that I needed a way to organize all my stuff in a way that was better than a ceramic bowl (things get tangled in there, chains get knotted – it gets crazy). Jewelry stands are also great because they can double as a cute decorative piece for your room in addition to organizing your jewelry life. After shopping around for longer than probably necessary, I finally came across a tree-shaped jewelry holder that caught my eye. However, I realized I wasn’t willing to spend the money on it (I’m stingy and I know it), and was inspired to try DIY-ing a jewelry stand. Continue reading “DIY Tree Jewelry Stand”